There are so many ways to present your images today. When you want to sell yopur images within the professional market then one way to do this is via a portfolio. If you are visiting a client then this is a good way to show them your work, as well as referring to your web site. But choosing the right portfolio can be very difficult, and this is the one opportunity that you have to amke an impression.
With the great variety and types on offer, re finish, size, binding method and cost.
The portfolio must be presented in a clear and logical way, as it does represent your work and methods to some extent, and be relevant to the job in hand. Don't forget that this portfolio will probably go through several hands and therefore needs to be robust as well as artistic, therefore durabilty, flexibility, persentation and cost will all need to be considered.
These are the parts to be considered:-
Bindings- needs to be flexible enough to update content, but depends on your type of work and how often you need to update. Permanent bindings are veruy good if you do not intend to update eg for 6 months.
Orientation - this is very much a personal choice and depends on the type and style of your photography. It is not a good idea to mix landscape and portrait orientation together. Consider using A3 eg then you can use a combination of portrait and landscape. Some books of photographs use this method to save the reader spinning the book round.
Robustness - Waterproofing, protective bags, slip boxes and a good binding help to withstand the elements, and being thrown around floors, couriers etc. Will the client put the cover on a again????
Size - This is purely a personal matter and to how you want to present your work. The most common sizes tend to be 14x 11ins A4 and A3. Depends on the siz eof your wallet!
Design - A smart and eye catching design can really work, but can be more expensive, but will stand out from the off-the-peg portfolios. Subtle personalisation will really work better.
Quality - Do you offer an quality photographic product? Your portfolio will reflect this. A bespoke or high end portfolio is a quality product and is an investment in yourself, as it demonstrates that you are serious and pay attention to detail.
There are many types of portfolio and listed below are some common types
Leather embossed portfolios- these are like books and come with a variety of binding methods
Ipad folio- to keep up with the latest the this folio has been designed around the apple ipad. Needs technical expertise to view though.
Machina presentation books- these are aluminium covers and lies flat when open, and nylon jackets are available to protect from light, dust and scratches.
Portfolio boxes - been around a long time in any forms, and is a very popular way of showing your images.
BUT YOUR IMAGES HAVE TO BE FIRST CLASS, WELL PRITED AND RELEVANT
Showing posts with label M2. Show all posts
Showing posts with label M2. Show all posts
Wednesday, 2 February 2011
Saturday, 15 January 2011
310 - Final prints for Emma
Below are the final prints for my theme with Emma.
I have chosen to show the work flow for one of the images, and I will also include 1 image printed on the college computer and 1 image from my home printer to show the comparison.
Here is the workflow for my chosen image.
 This is a JPG version of the original RAW image in the camera, the reason for the jpg image is to load onto this blog. A polariser filter was used in natural light.
 Here is a comparison of the image in 2 different forms to show the difference in the beginning of the post production. I do attempt to get the best image in the camera that I can to eliminate alot of post production work.


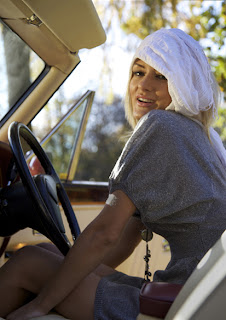

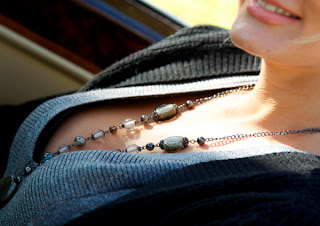
 This image also links into the other theme I have been working on as it shows Emma's jewellery that I asked her to wear. The other theme is only of the jewellery itself, but this another way to present the jwellery, depending on the client need.The jewellery was her own and this image is in line with my research on how to photograph jewellery. The light has been reflected here onto Emma.


I have chosen to show the work flow for one of the images, and I will also include 1 image printed on the college computer and 1 image from my home printer to show the comparison.
Here is the workflow for my chosen image.


Here is the next image which shows the cropping I have chosen, which is to A3 proportions, along with some cloning to elimate the obstacles that do not add to the image eg the door pillar. Perhaps a slightly different view could have eliminated the door pillar for example in the original image to avoid some post treatment works.

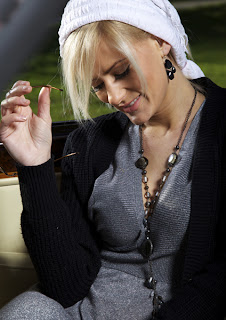
This is the next part of the sequence where an adjustment was done in curves in this instance. there are many other means to achieve the desired effect eg addtional layers to alter the image, levels, colour management measures etc..

This shows how I achieved my final image with a final crop to tidy up any points that detract from the main theme of the image.
Please refer to my blog dated Monday 8th November 2010, which covers the day of the car shoot. This also shows my reserarch into car/model photography. The main influences were from Manfred Reinfried and Gabriele Rigon. I choose the above images based upon an adaption of the images that these photographers produced and shown on the previous blog. I would like to redo these images later on the year as November is perhaps not the best time of the year to do this sort of shoot, although we had glorious sunshine all day. we did use additinal lighting which is noted in other blogs below.
I will be printing off my home printer to show how this printer performs in relation to the printer used at College. At home I use compatible inks with Tesco Super glossy A4 inkjet photo paper (260gsm) which provides an acceptable print, but is not up to exhibition standard. At college I will be using a HP Photosmart B9180 printer, which is calibrated from the monitor, to the printer to the paper used. The paper used HP Satin Matt A3+ 250g/m2(Q5462A) which produces an exhibition quality print.
and here is the final image

EMMA
Set out below are the other final 9 images to complete the set. A similar workflow has been done on these to that above.


This also shows some of the jewellery that Emma was using. I had a separate theme to this one of Emma herself.


I have provided an A2 portfolio with the above prints slipped inside. The presentation of these images is to illustrate the final putcome of the workflow, from idea through planning, costing, preplanning of the shoot amnd finally the shoot itself. From there the images have been downloaded and produced and are now set out in the portfolio.
Monday, 10 January 2011
310 - printers
There is such a great market for printers, at so many different types and prices, it can very difficult to decide which one to choose. Dot matrix, ink jet, and laser being some types, either colour and/or black and white.
The choice also very much depends on how you are going to produce your prints, and this should be considered prior to your your shoot, and to fit in with your client brief should you have one.
The variety of printing methods today is vast (for digital printing) as is the surfaces to which you can print. These vary from your cheap supermarket papers to archival papers, to aluminium and acrylic, from photographic papers to canvas. Your image can look very different depending on the surface it is printed on. There is also the choice of Matt, semi matt and Gloss for instance,and some in between.
I tend however to send my printing requirements away to an on-line printer as the results are so much better.
The major consideration today is the cost of the inks. When I visited the professional studio of Paulo Loroso the main consideration in the final print was the cost of the inks, and this was the most expensive part of his (or any other photographers business) business. Some businesses offer only CD's/DVDs for the client to take away, and let them print the ones that they require. However there are other mediums to consider, such as the web, and maybe the reuirment to print from this.
My home printer is an A4 Epson stylus PHOTO 220R printer. It uses Epson's unique Micro Piezo print head and 6-colour inks. The prints can also be made borderless on formats from 10 x 15cm to A4. With a resolution up to 5760dpi on suitable media. It has the ability to print on CD/DVDs. You can also apply effects, change layouts and add frames to the photos, with the included range of easy to use software. It is PC and MAC compatible, and has the Epson Print Image Matching III for faithful photo reproduction. The printer produces acceptable prints using the Epson Inks, which tend to be expensive. I have also used Epson papers previously to produce my prints, as the inks are matched for this make of paper.
The technical specification follows:-
Epson Stylus Photo R220 6 colour inkjet photo printer, Epson Micro Piezo™ Up to 5760* x 1440dpi, *optimised dpi on suitable media *1 15ppm*2 15ppm*3 120 A4 sheets plain paper, 100 A4 Photo Quality Ink Jet Paper,2 (Plain Paper). Up to 300g/m2


 It has 8 ink cartridges, Matt black, photo black, light grey, light cyan,cyan, light magenta, magenta and yellow.(similar to my home Epson printr but has 2 more black inks). The print quality for colour is up to 4800 optimized dpi colour (up to 4800x1200 dpi colour when printing from acomputer and 1200 input dpi).
Below are the sheets that were printed from the printer I used to submit my final images from.


 My personal preference is to use the college printer, as it is calibrated through from the Mac screen to the final print, and gives me the print that I want, and will last, given that it will need mounting correctly, with the appropriate frame and glazing.
The choice also very much depends on how you are going to produce your prints, and this should be considered prior to your your shoot, and to fit in with your client brief should you have one.
The variety of printing methods today is vast (for digital printing) as is the surfaces to which you can print. These vary from your cheap supermarket papers to archival papers, to aluminium and acrylic, from photographic papers to canvas. Your image can look very different depending on the surface it is printed on. There is also the choice of Matt, semi matt and Gloss for instance,and some in between.
I tend however to send my printing requirements away to an on-line printer as the results are so much better.
The major consideration today is the cost of the inks. When I visited the professional studio of Paulo Loroso the main consideration in the final print was the cost of the inks, and this was the most expensive part of his (or any other photographers business) business. Some businesses offer only CD's/DVDs for the client to take away, and let them print the ones that they require. However there are other mediums to consider, such as the web, and maybe the reuirment to print from this.
My home printer is an A4 Epson stylus PHOTO 220R printer. It uses Epson's unique Micro Piezo print head and 6-colour inks. The prints can also be made borderless on formats from 10 x 15cm to A4. With a resolution up to 5760dpi on suitable media. It has the ability to print on CD/DVDs. You can also apply effects, change layouts and add frames to the photos, with the included range of easy to use software. It is PC and MAC compatible, and has the Epson Print Image Matching III for faithful photo reproduction. The printer produces acceptable prints using the Epson Inks, which tend to be expensive. I have also used Epson papers previously to produce my prints, as the inks are matched for this make of paper.
The technical specification follows:-
Epson Stylus Photo R220 6 colour inkjet photo printer, Epson Micro Piezo™ Up to 5760* x 1440dpi, *optimised dpi on suitable media *1 15ppm*2 15ppm*3 120 A4 sheets plain paper, 100 A4 Photo Quality Ink Jet Paper,2 (Plain Paper). Up to 300g/m2
(Ultra Glossy Photo Paper)
Envelope C6 (162 x 114mm), No 10 (241.3 x 104.8mm),
DL (220 x 110mm & 220 x 132mm)
Envelope Weight From 45 to 75g/m
2 Maximum Printable Area (mm)
Print Margin 0mm top, left, right and bottom*
*Via custom setting in printer driver.
Consumables
Black T0481
Capacity Black 450 A4 pages (at 360dpi, 5% duty)
Colour T0482 (Cyan), T0483 (Magenta), T0484 (Yellow), T0485 (Light Cyan),
T0486 (Light Magenta)
Capacity Colour 430 A4 pages (at 360 dpi, 5% duty per colour)
Dimensions
Standard (wxdxh) 462 x 263 x 196 mm
Operational (wxdxh) 462 x 474 x 297 mm
Weight
5.2Kg Noise Level
Approx 45dB(A) (ISO 7779) Power Consumption
Approx 12W (per ISO 10561 Letter Pattern) Regulations
ENERGY STAR Compliant EMC Directive 89/336/EEC Warranty
Standard 1 Year Standard Warranty
Optional Extension to 3 years
Print Technology
print head
Epson Variable-sized Droplet Technology with
minimum 3pl droplets
Print head of 540 nozzles (6 x 90 per Black, Cyan,
Magenta, Yellow, Light Cyan, Light Magenta)
Print Quality
using RPM (Resolution Performance Management)
Operating System
Microsoft® Windows® 98 / Me / 2000 / XP and Macintosh® 
Below is one aspect that needs to be checked with any printer, and that is a nozzle check.

I do not generally use this printer for producing photographs as the quality is inconsistant, and generally not up to gallery standard, and only being A4 and I have not been able to calibrate this printer due to the software being expensive.
Generally I use an online printing outfit for my larger prints. This is a company called D S Colour Labs Ltd, working in association with Fujifilm. They offer the full range of services from Prints through to photobooks to acrylic panels and photoflyers, and a whole range of gift ideas.
They use Fuji Frontier 570 printers, and all images sent to them are using their printer profile that they have sent. Images can also be supplied as sRGB. Below is the monitor calibration chart that they supply. This is also a crucial part of the printing process, as you want to get a print that replicates what you see on the computer screen. details for this are noted elsewhere on the blog.

The printer is Fujifilms most popular high volume digital lab system,and with high processing capacities can produce prints in minutes. I have them delivered next day by post. Below is an illustration of the printer.

The specification for this printer is very technical and is not included here, but I have a copy as a PDF on my laptop.
There are many alternative suppliers of this facility, and at varying prices. I have chosen this lab as to date it has produced the best value prints, which is very important in todays economic world. I would add however that I will investigate other sources of printing depending on the final destination of the images.
The other current option is to use the printers at college. This printer is an HP Photosmart B9180 and is aim ed at the professional and creative market, launched Feb 2002..

Below are the sheets that were printed from the printer I used to submit my final images from.

this is the printer calibration sheet

this is the print quality diagnostics page
The paper used is HP Advanced injet paper (satin-matt) at A3+ 250g/m2, and is top gallery standard.
The paper used is HP Advanced injet paper (satin-matt) at A3+ 250g/m2, and is top gallery standard.

Black Text, A4 (Economy Mode)
Colour Text, A4 (Economy Mode)
Photo Bike Image, 10x15cm, 13x18cm, 57 seconds, 88 seconds, 163 seconds
A4 (Photo Mode)
Paper Handling
20 sheets of Premium or Semi Gloss Photo Paper; 15 envelopes
Paper Size A4, 9 x 13cm, 10 x 15cm, 13 x 18cm, 20 x 30cm, 3.5 x 5", 4 x 6",
5 x 8", 8 x 10", A5, A6, B5, Legal, Letter, Half Letter
Paper Weight From 64 to 90g/m
Monday, 27 December 2010
212 - general workflow chart
I have produced my own basic crib sheet for use on planning a shoot. the details will be different for any shoot and this chart serves as a starting point
General workflow chart (assuming using digital cameras)
Pre-shoot
Idea – | |
Prepare story board as required | |
Locate subjects –either people, objects, or both | |
Contact people, arrange time and describe shoot. If abroad check facilities and accommodation and travel details | |
Arrange to collect/use objects, and return details | |
Arrange dates at location, either on location or studio based | |
Decide final presentation of images | |
Arrange for assistants as required | |
Arrange for make-up/dressers/ props etc | |
Decide and sort equipment for shoot. Ensure all is in working order and batteries will be charged as necessary. Ensure sufficient power available | |
Carry out pre-shoot survey as required in either location. | |
Check on any health and Safety requirements/any restrictions to the location. | |
Check sufficient power available and the space required. | |
Confirm dates and actions | |
If working on location check the weather eg and if abroad check for any restrictions | |
Have a plan “B” should anything disrupt plan “A”, or arrange alternative dates | |
Double check all arrangements |
On the day
Arrive at location/studio | |
Set up equipment as required | |
Ensure all parties are present and aiming to complete shoot/make up done etc | |
Explain reason for shoot and outline procedures/ allocate responsibilities | |
Make a start, adjusting as the situation arises, due to artistic/restrictions etc | |
Edit/ artistic changes as the shoot progresses | |
Save images to another source as you go along to prevent loss | |
When complete pre-check images and re-shoot if necessary | |
Thank everybody for the time and effort | |
Wrap up the shoot and return everything to as it was at the start |
Post production
Download/copy images to another storage area | |
Confirm originals are OK and at least 2 copies available | |
Pre edit and delete unusable images | |
Post produce images using suitable software | |
Print/display images as required at the beginning | |
If a paid job see/discuss with client/get paid |
Refer to other blogs regarding client jobs and pricing etc, but this chart is a good starting point
Sunday, 26 December 2010
212 / 310 -Workflow/rights video and general tips for saving your work, etc
N i n e - V o l t : Photography news, tips & goodies
Check out the video on workflow within this web site. I found this a very interesting video as it illustrates how much work goes into the final production of the shoot. All the equipment and IT stuff has needed to be planned and costed and implemented. It would be an absolute disaster if all theimages and work done on the day of the shoot was lost.
All this expertise and euipment needs to built into the planning and costing of any shoot, and the client may need to be aware for the reasons to justify the cost.
It encapsulates all that I was taught when working in IT, and it shows the extent that as a professional photographer how far you have to go. Not only is the kit required to actually take the images, then to prepare the images immediately they are taken, including backups, in the field (if on location), then the amount of kit required to store and process the images.
Also checkout the image rights video as this explains the main points to look out for.
There are loads of links and items on this web site, so take your pick!
Monday, 6 December 2010
Unit 212 ---Working to a brief
Brief
Aim and objective
The aim of the brief is to provide me, the photographer, how you, the client, want the final image/s to be, and the object is to provide a record of photographs as you want them presented. in this instance a matt finish to printed images are to be presented into an A4 book.
Within this in mind, a collection of 10 images is required of Emma. The concept of the idea is the first thing that comes to mind, as is what and how you are going to photograph with the given brief. The next step is to work the idea given within the brief that has been given to you. The following step is to ascertain what the final image the client is after and to which format. Who is to provide the model, accessories props etc is the next step. Location of course is a vital consideration, studio or on location, as is the time of year should an outdoor location shoot be required.
The other part is to produce 10 images of Jewellery, which is going to have to be photographed in the studio, as seperate objects.
The other part is to produce 10 images of Jewellery, which is going to have to be photographed in the studio, as seperate objects.
Imaging approaches.
The client has chosen a book of images as his way of presenting them. There are various other ways and means of presenting this work. When on location/in the studio taking these images you have to aware of the final use of them. Therefore, you need to plan your approach. In this case, the images need to be A4 and produced in a book. Other means of preserving and presenting the images are available. CD/DVD and any other form of hard disc, for example on your computer or on server somewhere safe, or even on a memory stick, these are the first things to consider. Printing the required images is another way, but you have to be selective from the number you have taken. These can be printed in the local shop, off your home printer, professionally printed or on one of the many online shops. You have to be careful where you print them and the printing must match the requirements of the brief. In this instance the quality can be standard printing, but dependant on the brief some may be wanted for sale,advertising etc or need to be printed for archival purposes for example.
Management structure etc
Depending on the type of project that you are required to do, the following is a general outline of the roles and responsibilities
Ø The client and the person to report too. Who also pays the final agreed bill if the shoot is to his brief. The client has to be specific (or give the photographer licence to be creative).
Ø You the photographer, are responsible for everything! This involves the planning, costing, and timing of everything. A contingency plan should also be made to account for the weather for example if on location, or a person being unavailable, or for unforeseen costs, eg a car or model not turning up. It is also important that the photographer liases effectively with the client to ensure that the images taken will as required, artistic licence aside if necessary.
Ø The subject/s, be they animate or inanimate
Ø On location or in a studio, purpose built or “on set”. The photographer should check and double check that all is in order and on time. He may pass some of this over to his assistant.
Ø An assistant, or 2 or more as required. Their role is to support the photographer, check the gear is available and in good working order, shift gear, post- produce images in some cases at the time taken for instance.
Ø Location of lighting, props etc. The photographer needs to set the scene and will get his assistant to aid with this task/s.
Ø Communication between all parties is crucial to the success of the brief. Paths of communication need to be set from the beginning to ensure the success of the shoot.
Another important consideration is the access to facilities and to provision of food and drink when required.
Estimate of resources.
The resources needed are:
Time to prepare the outcome
Relevant choice of equipment to use, i.e. camera, 35mm or larger format,selection of lenses suitable for the situation, flash units, external lighting source, telephone, props etc
Provision of power packs etc to suit lighting and/or other electrical equipment e.g a laptop when on location. Ensure all batteries are charged to suit the requirements, or an external power source is available.
Use, or loan, or hire of car/s, model/s, jewellery, shoes etc
Decide what items to buy to complete brief eg shoes
Location or studio as required. Ensure the proper permissions are available and suitable for thre shoot, eg you are not trespassing .
Background, either on location or in the studio
Time scale required
PC or MAC to post produce images with relevant software to suit.
Transport to and from the location where required.
Access to facilities,changing areas, and food and drink where appropriate
Access to facilities,changing areas, and food and drink where appropriate
Health and Safety issues also need to be addressed where necessary.
All the above must be costed to the best of your knowledge. The photographer will have to decide what to spend money on and which items to spend money on, as he may be able to use props etc he already has. This can make significant savings on a shoot. A flowchart can be as complicated or as simple as you need, dependant on the shoot. Attention needs to be paid to who is responsible for what etc to provide a stress free shoot. A contingency sum also needs to be build in. This can be discussed and spent as required, with the client or not. Events do happen that you will not have costed for.
Workflow
- Plan for every part of the project. What is it I am going to create? What is the end product? If I want images for the web, resolution is not as important. If I want to print, then I need to know the target resolution and the required colour profile of the output device. I also need to know the file format requirements for the final media, which is a printed book in this instance. I need to scout the location. What time of day is the best time to photograph? Limited on car shoot by access to cars etc if a wet day and the owner will not get his car wet eg. I need to visualise the photograph I want to take and the tones I want in the end product in. I need to think about how to highlight the fashion accessories, and what positions I would like to see them in. I need to think about what lenses I am going to use, whether I need lighting or any other special equipment. Consider the use of a tripod etc. Will I need an assistant? Then I need to gather all the equipment and materials I need for the shoot. And to check the weather forecast for an outdoor location shoot, and have a plan B if possible.
- Now I need to focus on preproduction. I have scouted the location as part of my planning, and I am starting to visualise my images. I have assembled my lighting and props, umbrellas, etc . I am now doing lighting checks, and using the tripods. I do need to set up my camera for bracketing and white balance, depending on the final output I require for the book. I need to ensure I have enough battery power available for the shoot, for camera lighting and accessories. Preproduction encompasses all the things I need and want to accomplish prior to shooting.
- Record the images as per my visualisation, and show the models the tear sheets so that they have a good idea of what is required of them prior to the shoot. Ideas may change when actually taking the images.
- Then I begin my post-production, which in this case means loading the images onto my computer and editing them for cropping, colour, contrast or any other image defects I spot or are not suitable. It may be that minimum editing is required depending on how good the initial shoot was. I then need to prepare the images for production. Printing images may This is the production phase, and the final step. Here is where I decide which printing option I am going to use (I have done this from the beginning), either printing from a local printer or a commercial printer, to be sent in a format that can print from (eg DSCL require jpeg). Resolution and format are key to the photographic reproduction then it is important to plan from the beginning. I can then meet my target as set out from the beginning. The important part is that resolution and output size must be understood during the planning stage, so that I can get to the processing stage with the correct images.
Situation management.
When planning an outdoor shoot there are many things to consider, let alone the weather. Access and privacy are very important. Can you access the area you want to get to, does it invade anybodies privacy? An inspection prior to the shoot will answer many of these questions. You need to look for the ideal location. Is it going to be too sunny, or cold for instance, what can you do to counter this situation. A site survey will answer many questions and will affect your decision as to how you are to carry out the shoot and meet the requirements of the brief. Does the suggested location suit the brief, or does it have to be changed, and the client advised. Alternatives can be discussed at this stage. All decisions and timings must be available to all parties, and should be confirmed so a sto eliminate any errors and delays.
Experience from previous shoots will be an advantage and should reduce any problems, and can be raised and solved at the briefing with the client.
As an aside the photographers experience can help the client decide what he wants as a final image, and should be encouraged so that all parties are satisfied.
The above comments can also apply to any work done in the studio. For example can you get the props in, are there any alteration works needed, either studio based or on location. Do you need permission to carry out this work.
Each shoot and situation will produce their own differences, and these have to be explored prior to the shoot.
Health and safety considerations are very important in all locations, and they will always be different.
Legal considerations
There are personal and property issues here. There is a mountain of legislation to adhere to, but it all meant to protect the rights of everybody and everything. Data protection and confidentiality must not be overlooked, so as protect the identity of the person /s involved. Employers and employees are responsible for their own and others actions in all cases, and this should be made clear at the start of the work. Contract law is important between the parties involved, whatever form they take. Can be written, but part may be verbal, so it is important to record these verbal instructions.
These days’ working with minors is an important consideration, and reference to the Children’s Act, Children and Young Peoples Act for example must always be adhered too. The Obscene and Post Office Acts are also prevalent these days, but generally these will not come into everyday photography hopefully. Risk assessments must be done and advised as required.
Safety at work is an important consideration and applies to photographers as much as anybody else.
The Safety at Work act is a powerful document. Personal equipment needs to be in the best condition. It will fall to the photographer to check all is in order.
Awareness of Acts such as the Countryside Act/Countryside Code should also be adhered to.
Intellectual rights and intellectual property refers to creative work which can be treated as an asset or physical property. This has become a very important area, and with the advent and use of the internet then huge problems arise in this area. It is difficult to control these days, but Copyright, Trademarks, Design rights and Patents all fall into the intellectual category.
Pricing photography
Price depends on the usage of the final image/s, and depends also on the clients usage thereafter. These day’s license issues are the main topic used in negotiations. The photographer has to decide how his images are to be used within the context of the brief. There are many ways to satisfy the client’s use of the images. I can license “unlimited” use in a limited way by restricting the time, location, and/or range of use, while leaving other parts unrestricted. I can also put a whole time limit on the use of these images, i.e. a limited period. If they are not be used internationally, for example, then the client does not need to pay for this, nor for example if the client is not going to use the images on a large bill board.
The parameters and use of the images need to be discussed and agreed at the negotiation stage with the client and to his use and then incorporate these discussions within the price and contract for the work. If the client wants unlimited use forever then he must realise the cost implications for this, and it is the photographer’s job to advise the client on these different aspects. The photographer may employ somebody to aid the negotiations at this point.
In some cases the where the client requires unlimited use, and the client has no obligation to me how he is to use the images and where, as it may pay them in their interest to play down their intended use. In these cases, it is up to me to overestimate, by a decent margin, the probable use by the client. It is in the photographer’s best interest to provide the best images for the client based on the brief and discussions at pre-photograph stage. Judgement also has to be made whether you want to take this commission if the use of the images is unclear, as your reputation is at stake.
Price is also very dependent on how the final images are to be used and in what location and situation. Sometimes the political situation needs to be addressed. Of course, everything needs to be within legal and ethical boundaries.
It is a very complex situation in the way of pricing as the market is currently very active and you can lose jobs by being too expensive. Extensive research is needed to establish the correct price for your work, as there is so much competition these days.
Below are listed the estimates I have compiled for the brief outlined.
Miriad studio estimate of costs
Estimate for Emma’s photo shoot.
QTY | Description | Rate £ | Total £ | Actual cost |
Fee for Meridian to produce an A4 book of Emma, and a selection of jewellery. To be over 3 shoot days on location and in a studio, to be licensed as per the agreed contract. Unlimited use of all images by Meridian only. | 900.00 | 900.00 | 50.00 | |
1 | Hire of Rolls Royce for 1 day incl driver | 375.00 | 375.00 | 50.00 |
1 | Hire of Ferrari for 1 day incl driver | 450.00 | 450.00 | 0.00 |
2 | Assistant for 2 days | 150.00 | 300.00 | 25.00 |
2 | Make- up artist for 1 day | 100.00 | 200.00 | 0.00 |
2 | Pre production days | 300.00 | 600.00 | 50.00 |
1 | Scouting day in incidental expenses | 350.00 | 350.00 | 85.00 |
1 | Travel expenses etc for Emma | 150.00 | 150.00 | 15.00 |
Cost of Emma’s time | free | free | 40.00 | |
Hire of location for shoot | 250.00 | 250.00 | 0.00 | |
Post production costs | 300.00 | 300.00 | 150.00 | |
Total £ | 3875.00 | 465.00 |
I have included a column showing the actual cost to me for this particular shoot as a comparison. The hire of the cars and location came free, as these are owned by friends. The model Emma was hired for the shown cost, and being a student there is no cost to me as a fee, but a cost will accrue to produce the final images. Pre- production costs were for visiting the owner and location of the cars, and for setting up my own car and borrowed lighting from the college to give me a trial run prior to the shoot.
Estimate for the Jewellery photo shoot.
QTY | Description | Rate £ | Total £ | Actual cost |
Fee for Meridian to produce an A4 book of Emma, and a selection of jewellery. To be over 3 shoot days on location and in a studio, to be licensed as per the agreed contract. Unlimited use of all images by Meridian only. | 900.00 | 900.00 | 50.00 | |
1 | Hire of studio for 1 day | 210.00 | 210.00 | 0.00 |
1 | Hire of jewellery for 1 day | 150.00 | 150.00 | 0.00 |
1 | Assistant for 1 days | 150.00 | 150.00 | 25.00 |
1 | Pre production days | 150.00 | 150.00 | 0 |
1 | Travel expenses etc | 150.00 | 150.00 | 15.00 |
1 | Hire of additional lighting | 150.00 | 150.00 | 0.00 |
1 | Post production costs | 1200.00 | 1200.00 | 50.00 |
Total £ | 2960.00 | 140.00 |
I have included a column showing the actual cost to me for this particular shoot as a comparison. Being able to borrow the jewellery (some clients may also provide free product) cost me nothing and also the use of the college studio was cost effective. A cost will occur for the final images.
There are more general costs also to consider, such as Insurance, costs of running a studio, etc but these should be built in to the Fee, and will be a standard as overheads which will be applied to all estimates. The above should also include catering and other facilities as well.
Conclusion
Working to a brief is certainly challenging, and preparation and planning is essential.This cannot start until the first part of the brief is carried out to get the client to describe the task in as much detail as he can. This is perhaps the most difficult part of the excercise, and needs to be carefully recorded and agreed between the parties to the contract, so that it limits any possible problems or interpretation at the later stages, especially with the presentation of the fianl shoot. Changes can be made, especially if the client is on site, but he has to remember that cahnges can cost more. from the photographers side he needs to be sure of his set up to meet the demands of the contract, and to ensure that new work does not impede on existing work. The challenge is to succeed when there are various types of work happening at the same time. Skill is required to attract the right assistants to enable a smooth flow of work. The expertise gained will be vital to providing the client wit the work that he wants, and show off when completed. The photography is probably the easier bit, the business side must prevail to succeed.
Subscribe to:
Posts (Atom)